- Details
- Written by: Stanko Milosev
- Category: WPF
- Hits: 7602
One example of creating resizable list boxes:
<Window x:Class="DragNdrop2resize.MainWindow"
        xmlns="http://schemas.microsoft.com/winfx/2006/xaml/presentation"
        xmlns:x="http://schemas.microsoft.com/winfx/2006/xaml"
        Title="MainWindow" Height="350" Width="525">
    <Grid>

        <Grid.ColumnDefinitions>
            <ColumnDefinition Width="1*"/>
            <ColumnDefinition Width="2*"/>
        </Grid.ColumnDefinitions>

        <ListBox Grid.Column="0">
            <ListBoxItem Content="List box 1"/>
        </ListBox>

        <ListBox Grid.Column="1">
            <ListBoxItem Content="List box 2"/>
        </ListBox>

        <GridSplitter Width="5"
                      HorizontalAlignment="Right"
                      VerticalAlignment="Stretch"
                      Background="Red" />

    </Grid>
</Window>
As you can see I created column definitions, and added ListBoxes which belong to these columns (Grid.Column="1" for example), and on the end I added GridSpliter. Taken from here.
---
2014-07-26 Update To have vertical resizable list boxes use something like:
<Window x:Class="WpfApplication13.MainWindow"
        xmlns="http://schemas.microsoft.com/winfx/2006/xaml/presentation"
        xmlns:x="http://schemas.microsoft.com/winfx/2006/xaml"
        Title="MainWindow" Height="350" Width="525">
    <Grid>
        <Grid.ColumnDefinitions>
            <ColumnDefinition Width="*" />
        </Grid.ColumnDefinitions>
        <Grid.RowDefinitions>
            <RowDefinition Height="60"/>
            <RowDefinition Height="*"/>
        </Grid.RowDefinitions>

        <ListBox Grid.Row="0">
            <ListBoxItem Content="List box 1"/>
        </ListBox>

        <ListBox Grid.Row="1">
            <ListBoxItem Content="List box 2"/>
        </ListBox>

        <GridSplitter Height="5"
                      HorizontalAlignment="Stretch"
                      VerticalAlignment="Bottom"
                      Background="Red" />
    </Grid>
</Window>
- Details
- Written by: Stanko Milosev
- Category: WPF
- Hits: 5198
To write this article I was using this web page.
For this example I was using code behind, since I didn't want to spend too much time on it.
So, first we will add two ListView's, I add them in a way to be resizible. Then, for first listview, from where you want to drag something, you need MouseMove event. Third, for second list view, where you want to drop something (in my case a simple string), Drop event, and AllowDrop has to be set to true.
Since it is recommended to start drag and drop after mouse moved a little bit, we need also PreviewMouseLeftButtonDown event.
So my XAML looks like this:
<Window x:Class="DragNdrop1.MainWindow"
        xmlns="http://schemas.microsoft.com/winfx/2006/xaml/presentation"
        xmlns:x="http://schemas.microsoft.com/winfx/2006/xaml"
        Title="MainWindow" Height="350" Width="525">
    <Grid>

        <Grid.ColumnDefinitions>
            <ColumnDefinition Width="1*"/>
            <ColumnDefinition Width="2*"/>
        </Grid.ColumnDefinitions>

        <ListView  x:Name="listBox1" Grid.Column="0" MouseMove="listBox1_MouseMove" PreviewMouseLeftButtonDown="ListBoxItem_PreviewMouseLeftButtonDown">
            <ListViewItem Content="List box 1"/>
        </ListView>

        <ListView Grid.Column="1" Margin="5,0,-5,0" Drop="ListBox_Drop" AllowDrop="True">
            <ListViewItem Name="itemTest" Content="List box 2"/>
        </ListView>

        <GridSplitter Width="5"
                      HorizontalAlignment="Right"
                      VerticalAlignment="Stretch"
                      Background="Red" />

    </Grid>
</Window>
Code looks like this:
using System;
using System.Windows;
using System.Windows.Controls;
using System.Windows.Input;

namespace DragNdrop1
{
  /// <summary>
  /// Interaction logic for MainWindow.xaml
  /// </summary>
  public partial class MainWindow : Window
  {
    public Point startPoint;

    public MainWindow()
    {
      InitializeComponent();
    }

    private void ListBoxItem_PreviewMouseLeftButtonDown(object sender, MouseButtonEventArgs e)
    {
      startPoint = e.GetPosition(null);
    }

    private void ListBox_Drop(object sender, DragEventArgs e)
    {
      if (e.Data.GetDataPresent("myFormat"))
      {
        string dragString = e.Data.GetData("myFormat").ToString();
        ListView listView = sender as ListView;
        listView.Items.Add(dragString);
      }
    }

    private void listBox1_MouseMove(object sender, MouseEventArgs e)
    {
      // Get the current mouse position
      Point mousePos = e.GetPosition(null);
      Vector diff = startPoint - mousePos;

      if (e.LeftButton == MouseButtonState.Pressed &&
          (Math.Abs(diff.X) > SystemParameters.MinimumHorizontalDragDistance ||
          Math.Abs(diff.Y) > SystemParameters.MinimumVerticalDragDistance))
      {
        string dragString = "Yo! A test!";

        // Initialize the drag & drop operation
        DataObject dragData = new DataObject("myFormat", dragString);
        DragDrop.DoDragDrop(itemTest, dragData, DragDropEffects.Move);
      }
    }
  }
}
Things to notice are lines:
string dragString = "Yo! A test!";

// Initialize the drag & drop operation
DataObject dragData = new DataObject("myFormat", dragString);
DragDrop.DoDragDrop(itemTest, dragData, DragDropEffects.Move);
Here you can see dragData object which I am creating under "myFormat" string, and which I am then passing to DoDragDrop method.
Example you can download from here.
- Details
- Written by: Stanko Milosev
- Category: WPF
- Hits: 4857
I wanted to list all cursors which exist in system, and I realized that this is not so easy. So, this is only solution which I have found in Microsoft help:
private Cursor[] CursorList()
{
	// Make an array of all the types of cursors in Windows Forms.
	return new Cursor[] {
		Cursors.AppStarting, Cursors.Arrow, Cursors.ArrowCD, Cursors.Cross,
		Cursors.Hand, Cursors.Help,
		Cursors.IBeam, Cursors.No, Cursors.None, Cursors.Pen,
		Cursors.SizeAll, Cursors.ScrollE, Cursors.ScrollN, Cursors.ScrollNE, Cursors.ScrollNS, Cursors.ScrollNW, Cursors.ScrollS, Cursors.ScrollSE, Cursors.ScrollSW, Cursors.ScrollW, Cursors.ScrollWE, Cursors.SizeAll,
		Cursors.SizeNESW, Cursors.SizeNS, Cursors.SizeNWSE,
		Cursors.SizeWE, Cursors.UpArrow,
		Cursors.Wait
	};
}

private void Button_Click(object sender, RoutedEventArgs e)
{
	foreach (var cursor in CursorList())
	{
		System.Threading.Thread.Sleep(500);
		this.Cursor = cursor;
	}
}
As you can see first I had to write array of cursors, and then I was looping through that array, and assigning cursors.
- Details
- Written by: Stanko Milosev
- Category: WPF
- Hits: 6146
First, lets create one XAML with styles:
<Window x:Class="ResourceDictionary.MainWindow"
        xmlns="http://schemas.microsoft.com/winfx/2006/xaml/presentation"
        xmlns:x="http://schemas.microsoft.com/winfx/2006/xaml"
        Title="MainWindow" Height="350" Width="525">

    <Window.Resources>
        <Style x:Key="myStyle" TargetType="Button">
            <Setter Property="Background" Value="Orange" />
            <Setter Property="FontStyle" Value="Italic" />
            <Setter Property="Padding" Value="8,4" />
            <Setter Property="Margin" Value="4" />
        </Style>
    </Window.Resources>

    <Grid>
        <StackPanel Orientation="Horizontal" VerticalAlignment="Top">
            <Button Style="{StaticResource myStyle}">Styles</Button>
            <Button Style="{StaticResource myStyle}">are</Button>
            <Button Style="{StaticResource myStyle}">cool</Button>
        </StackPanel>
    </Grid>
</Window>
So, first part which you have to notice is:
<Window.Resources>
	<Style x:Key="myStyle" TargetType="Button">
		<Setter Property="Background" Value="Orange" />
		<Setter Property="FontStyle" Value="Italic" />
		<Setter Property="Padding" Value="8,4" />
		<Setter Property="Margin" Value="4" />
	</Style>
</Window.Resources>
With that part we are defining resources, and to use it, we can simply write something like:
Style="{StaticResource myStyle}"
Notice myStyle, this is name of our resource.
Now, lets move that our style to ResourceDictionary.
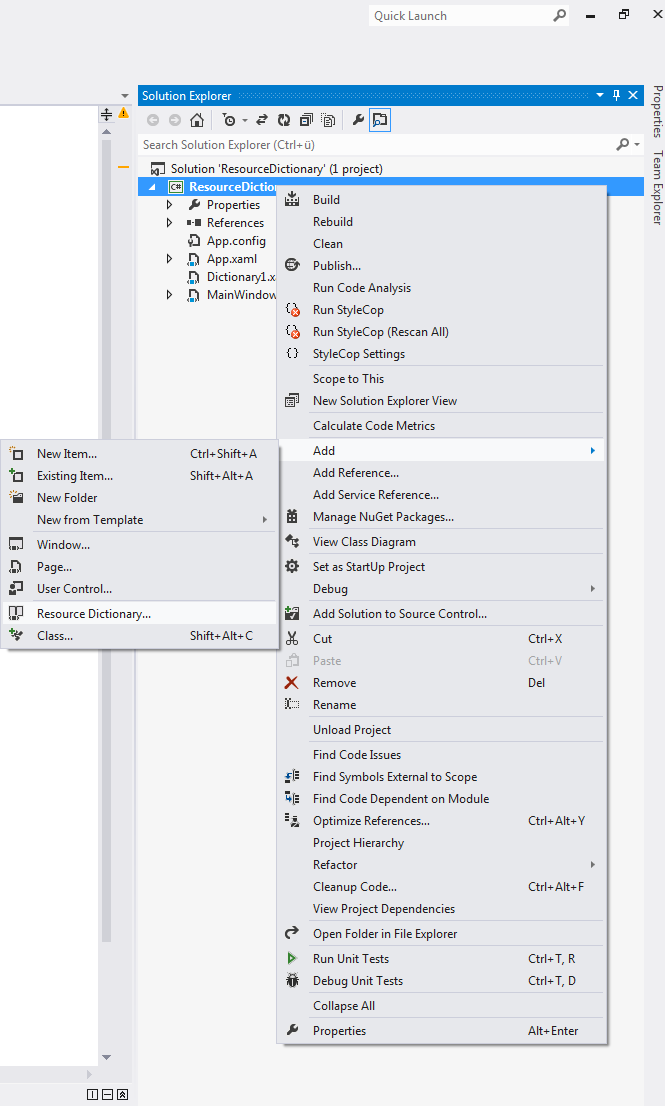
Start new WPF project, in solution explorer right click on the project add -> Resource Dictionary:
Name it as you wish (in my case I name it Dictionary1.xaml), now cut myStyle from MainWindow.xaml and paste it to your dictionary file, in my case it looks like this:
<ResourceDictionary xmlns="http://schemas.microsoft.com/winfx/2006/xaml/presentation"
                    xmlns:x="http://schemas.microsoft.com/winfx/2006/xaml">
    <Style x:Key="myStyle" TargetType="Button">
        <Setter Property="Background" Value="Orange" />
        <Setter Property="FontStyle" Value="Italic" />
        <Setter Property="Padding" Value="8,4" />
        <Setter Property="Margin" Value="4" />
    </Style>
</ResourceDictionary>
In MainWindow.xaml write something like:
<Window x:Class="ResourceDictionary.MainWindow"
        xmlns="http://schemas.microsoft.com/winfx/2006/xaml/presentation"
        xmlns:x="http://schemas.microsoft.com/winfx/2006/xaml"
        Title="MainWindow" Height="350" Width="525">

    <Window.Resources>
        <ResourceDictionary>
            <ResourceDictionary.MergedDictionaries>
                <ResourceDictionary
                  Source= "Dictionary1.xaml">
                </ResourceDictionary>
            </ResourceDictionary.MergedDictionaries>
        </ResourceDictionary>
    </Window.Resources>

    <Grid>
        <StackPanel Orientation="Horizontal" VerticalAlignment="Top">
            <Button Style="{StaticResource myStyle}">Styles</Button>
            <Button Style="{StaticResource myStyle}">are</Button>
            <Button Style="{StaticResource myStyle}">cool</Button>
        </StackPanel>
    </Grid>
</Window>
Note source, and that is all.