- Details
- Written by: Stanko Milosev
- Category: Ubuntu
- Hits: 53
Hier I already gave one example how to install Nginx, now here is example how to install ASP.NET Core 10 Application on Ubuntu 24.04 with Nginx.
This guide explains how to deploy an ASP.NET Core 10 application from a Windows 11 development machine to an Ubuntu 24.04 server running inside VMware. It covers installing the .NET runtime, publishing the application, copying it to Ubuntu, testing it manually, and configuring it as a systemd service.
Install the .NET 10 Runtime
Download and install Microsoft's package repository.
wget https://packages.microsoft.com/config/ubuntu/24.04/packages-microsoft-prod.deb
sudo dpkg -i packages-microsoft-prod.deb
sudo apt update
sudo apt install -y aspnetcore-runtime-10.0
Verify the Installation
dotnet --info
You should see output similar to:
.NET SDK:
 Version:           10.0.xxx

Host:
  Version:          10.0.xxx
  Architecture:     x64
  RID:              linux-x64

.NET runtimes installed:
  Microsoft.AspNetCore.App 10.0.xxx
  Microsoft.NETCore.App    10.0.xxx
Publish the Application on Windows 11
On your Windows development machine, open a command prompt in the folder containing your solution (.sln) file.
Publish the application directly to your VMware shared folder.
dotnet publish -c Release -o "\\vmware-host\Shared Folders\ubuntuVmShare\asp"
After publishing completes, the output folder will contain everything needed to run the application.
Copy the Published Application to Ubuntu
Assuming your VMware shared folder is named ubuntuVmShare, copy the published files to the web directory.
sudo cp -a /mnt/hgfs/ubuntuVmShare/asp/. /var/www/html/net/
Change to the application directory.
cd /var/www/html/net/
Locate the Application DLL
Search for the runtime configuration file.
find . -name "*.runtimeconfig.json"
Example output:
./Kanaloa.runtimeconfig.json
The filename tells you which DLL to start. In this example, the application is started with:
dotnet Kanaloa.dll
Run the Application Manually
If everything is configured correctly, you should see output similar to:
warn: Microsoft.AspNetCore.DataProtection.KeyManagement.XmlKeyManager[35]
      No XML encryptor configured. Key {de507390-fb82-4965-a58a-0e17b6285227} may be persisted to storage in unencrypted form.

info: Microsoft.Hosting.Lifetime[14]
      Now listening on: http://localhost:5000

info: Microsoft.Hosting.Lifetime[0]
      Application started. Press Ctrl+C to shut down.

info: Microsoft.Hosting.Lifetime[0]
      Hosting environment: Production

info: Microsoft.Hosting.Lifetime[0]
      Content root path: /var/www/html/net
The Data Protection warning is normal for many server installations and does not prevent the application from running.
Press Ctrl+C to stop the application before continuing.
Create a systemd Service
Create a new service definition.
sudo nano /etc/systemd/system/kanaloa.service
Insert the following configuration:
[Unit]
Description=Kanaloa ASP.NET Core API
After=network.target

[Service]
Type=simple
WorkingDirectory=/var/www/html/net
ExecStart=/usr/bin/dotnet /var/www/html/net/Kanaloa.dll

Restart=always
RestartSec=5

User=www-data
Group=www-data

Environment=ASPNETCORE_ENVIRONMENT=Production
Environment=ASPNETCORE_URLS=http://127.0.0.1:5000

[Install]
WantedBy=multi-user.target
Save the file (Ctrl+S) and exit Nano (Ctrl+X).
Reload systemd
Reload the service definitions.
sudo systemctl daemon-reload
Enable the Service
Configure the service to start automatically during boot.
sudo systemctl enable kanaloa
Expected output:
Created symlink:
/etc/systemd/system/multi-user.target.wants/kanaloa.service
→ /etc/systemd/system/kanaloa.service
Start the Service
sudo systemctl start kanaloa
Verify the Service Status
sudo systemctl status kanaloa
You should see something similar to:
● kanaloa.service - Kanaloa ASP.NET Core API
     Loaded: loaded (/etc/systemd/system/kanaloa.service; enabled)

     Active: active (running)

     Main PID: 12345 (dotnet)

      Tasks: ...
      Memory: ...
      CPU: ...
The important line is:
Active: active (running)
Summary
Your ASP.NET Core application is now:
- Running on Ubuntu 24.04.
- Listening on http://127.0.0.1:5000.
- Managed automatically by systemd.
- Configured to start automatically whenever the server boots.
- Details
- Written by: Stanko Milosev
- Category: Ubuntu
- Hits: 35
This guide explains how to prepare a clean Ubuntu installation for Joomla! by installing Nginx, MariaDB, and PHP 8.5. It also includes VMware shared folder access, database import, PHP configuration, and the initial Joomla! directory setup.
Access VMware Shared Folders (Windows 11 Host)
If you are testing Ubuntu in VMware Workstation and your host operating system is Windows 11, mount the shared folders first.
sudo mkdir -p /mnt/hgfs
sudo vmhgfs-fuse .host:/ /mnt/hgfs -o allow_other
Update Ubuntu
Always start by updating the operating system.
sudo apt update
sudo apt upgrade -y
sudo reboot
Install Nginx
Install the Nginx web server.
sudo apt install nginx -y
Reboot the server after installation.
sudo reboot
Verify that Nginx is Running
sudo systemctl status nginx
You should see output similar to:
● nginx.service - A high performance web server and reverse proxy server
     Loaded: loaded (/usr/lib/systemd/system/nginx.service; enabled)
     Active: active (running)
Check the Default Document Root
sudo nginx -T | grep root
Expected output:
root /var/www/html;
Install MariaDB
Update the package list once more.
sudo apt update
sudo apt upgrade -y
sudo reboot
Install MariaDB server and client.
sudo apt install mariadb-server mariadb-client -y
Reboot after installation.
sudo reboot
Verify Installation
mariadb --version
sudo systemctl status mariadb
You should see something similar to:
mariadb  Ver 15.1 Distrib 11.x.x

● mariadb.service - MariaDB Database Server
     Active: active (running)
Secure MariaDB Installation
Run the MariaDB security script.
sudo mariadb-secure-installation
Recommended answers:
| Question | Recommended Answer |
|---|---|
| Enter current password for root (enter for none) | Enter current password |
| Switch to unix_socket authentication? | Y |
| Change the root password? | N |
| Remove anonymous users? | Y |
| Disallow root login remotely? | Y |
| Remove test database? | Y |
| Reload privilege tables now? | Y |
Create the Joomla! Database
Open the MariaDB console.
sudo mariadb
Create a new database.
CREATE DATABASE joomla
CHARACTER SET utf8mb4
COLLATE utf8mb4_unicode_ci;
Import an Existing Joomla! Database
If you already have a Joomla! database backup, import it using:
sudo mariadb joomla < joomla.sql
Import an Existing Joomla! Database with create database
mariadb -u root -p < mydatabase.sql
Install PHP 8.5
Install the required repository packages.
sudo apt install -y software-properties-common ca-certificates curl

sudo add-apt-repository ppa:ondrej/php -y
sudo apt update
Install PHP 8.5 together with the extensions commonly required by Joomla!.
sudo apt install -y \
    php8.5 \
    php8.5-cli \
    php8.5-fpm \
    php8.5-common \
    php8.5-mysql \
    php8.5-curl \
    php8.5-gd \
    php8.5-mbstring \
    php8.5-xml \
    php8.5-zip \
    php8.5-intl \
    php8.5-bcmath
Reboot the server.
sudo reboot
Verify PHP Installation
php -v
sudo systemctl status php8.5-fpm
Expected output:
PHP 8.5.x

● php8.5-fpm.service
     Active: active (running)
Configure Nginx to Process PHP Files
Open the default Nginx site configuration.
sudo nano /etc/nginx/sites-available/default
Locate the following commented block:
# Add index.php to the list if you are using PHP
index index.html index.htm index.nginx-debian.html;
and add index.php to the list. The following:
location / {
	# First attempt to serve request as file, then
	# as directory, then fall back to displaying a 404.
	try_files $uri $uri/ =404;
}
change to:
location / {
	# First attempt to serve request as file, then
	# as directory, then fall back to displaying a 404.
	try_files $uri $uri/ /index.php?$args;
}
Following:
# pass PHP scripts to FastCGI server
#
#location ~ \.php$ {
#       include snippets/fastcgi-php.conf;
#
#       # With php-fpm (or other unix sockets):
#       fastcgi_pass unix:/run/php/php7.4-fpm.sock;
#       # With php-cgi (or other tcp sockets):
#       fastcgi_pass 127.0.0.1:9000;
#}
Replace it with:
# pass PHP scripts to FastCGI server
#
location ~ \.php$ {
    include snippets/fastcgi-php.conf;

    # With php-fpm
    fastcgi_pass unix:/run/php/php8.5-fpm.sock;
}
Since opening articles didnt work, I was receiving 404, at the end my configuration looks like:
location / {
    try_files $uri $uri/ =404;
}

location /joomla/ {
    try_files $uri $uri/ /joomla/index.php?$query_string;
}

location ~ \.php(?:/|$) {
    include snippets/fastcgi-php.conf;

    fastcgi_split_path_info ^(.+?\.php)(/.*)$;
    fastcgi_param PATH_INFO $fastcgi_path_info;
    fastcgi_param SCRIPT_FILENAME $document_root$fastcgi_script_name;

    fastcgi_pass unix:/run/php/php8.5-fpm.sock;
}
Save the file (Ctrl+S) and exit Nano (Ctrl+X).
Verify the Nginx Configuration
sudo nginx -t
Expected output:
nginx: configuration file /etc/nginx/nginx.conf test is successful
Restart Nginx
sudo systemctl restart nginx
Create a PHP Test Page
Create a simple phpinfo() page.
sudo nano /var/www/html/info.php
Add the following content:
<?php
phpinfo();
Save the file (Ctrl+S) and exit Nano (Ctrl+X).
Open your browser and navigate to:
http://127.0.0.1/info.php
If PHP is configured correctly, the PHP information page will be displayed.
Prepare the Joomla! Directory
After copying your existing Joomla! files, create the destination folder if necessary and assign ownership to your current user.
sudo mkdir -p /var/www/html/joomla
sudo chown $USER:$USER /var/www/html/joomla
You can now copy your Joomla! files into /var/www/html/joomla and continue with the Joomla! configuration.
Add user to MariaDb and grant permissions:sudo mariadb CREATE USER 'joomla'@'localhost' IDENTIFIED BY 'myPass'; GRANT ALL PRIVILEGES ON joomla.* TO 'joomla'@'localhost'; FLUSH PRIVILEGES;Test:
mariadb -u joomla -pIf it logs in successfully, run:
USE joomla;
SHOW TABLES;
Update configuration.php
sudo nano /var/www/html/joomla/configuration.phpChange these lines:
public $user = 'joomla';
public $password = 'MyStrongPassword123!';
public $db = 'joomla';
Next Steps
- Copy your Joomla! files into /var/www/html/joomla.
- Adjust ownership and permissions if necessary.
- Update configuration.php with your database settings.
- Open your Joomla! website in the browser and verify everything is working correctly.
- Details
- Written by: Stanko Milosev
- Category: Ubuntu
- Hits: 19
If you want to have Nginx on same machine where Mailcow, then rather install first Nginx, like I explained here
This guide explains how to install Mailcow on a clean Ubuntu installation.
In this example the Mailcow hostname is:
mail.localmilosev.com
Replace the hostname, domain name and IP address with your own values where necessary.
1. Update Ubuntu
Update the package list:
sudo apt update
Upgrade all installed packages:
sudo apt upgrade -y
Restart Ubuntu:
sudo reboot
2. Install curl
Install curl:
sudo apt install curl -y
Verify the installation:
curl --version
3. Install Docker and Git
Install Docker, Docker Compose and Git:
sudo apt install -y docker.io docker-compose-v2 git
Restart Ubuntu (recommended):
sudo reboot
Enable Docker:
sudo systemctl enable docker
Start Docker:
sudo systemctl start docker
Verify the installation:
sudo systemctl status docker
docker --version
docker compose version
4. Download Mailcow
Go to the installation directory:
cd /opt
Clone the Mailcow repository:
sudo git clone https://github.com/mailcow/mailcow-dockerized
5. Generate the Mailcow Configuration
Open the Mailcow directory:
cd /opt/mailcow-dockerized
Run the configuration generator:
sudo ./generate_config.sh
When asked for the hostname, enter:
mail.localmilosev.com
Select the stable branch:
1
6. Download and Start Mailcow
Download all Docker images:
sudo docker compose pull
This may take several minutes.
Before starting Mailcow if you already installed Nginx, then change the port for Mailcow:
cd /opt/mailcow-dockerized
sudo nano mailcow.conf
Search with help of Ctrl+W for HTTP_PORT or HTTPS_PORT, and change it to like:
HTTP_PORT=8080
HTTPS_PORT=8443
Start Mailcow:
sudo docker compose up -d
Wait a few minutes until all containers are initialized.
7. Check the Logs
Check the PHP-FPM container log:
sudo docker compose logs --tail=100 php-fpm-mailcow
You can also check whether all containers are running:
sudo docker compose ps
8. Recreate the Containers if Necessary
If Mailcow does not start correctly:
cd /opt/mailcow-dockerized
Stop the containers and remove the Docker volumes:
sudo docker compose down --volumes
Delete the Docker volume that stores Mailcow's MariaDB database
docker volume rm mailcowdockerized_mysql-vol-1
Download the images again:
sudo docker compose pull
Start Mailcow:
sudo docker compose up -d
Restart Ubuntu:
sudo reboot
9. Configure the Hosts File
Edit the hosts file:
sudo nano /etc/hosts
Add the following line:
192.168.138.130 mail.localmilosev.com
Your hosts file should look similar to this:
127.0.0.1 localhost
127.0.1.1 ubuntu
192.168.138.130 mail.localmilosev.com
Replace 192.168.138.130 with your server's IP address.
Save the file with Ctrl+S and exit with Ctrl+X.
10. Open the Administration Interface
Open the following URL in your browser:
https://mail.localmilosev.com/admin/
The default administrator credentials are:
Username: admin
Password: moohoo
11. Reset the Administrator Password
If necessary, reset the password:
cd /opt/mailcow-dockerized
sudo ./helper-scripts/mailcow-reset-admin.sh
12. Add Your Email Domain
Navigate to:
- Configuration
- Add Domain
Add your domain:
localmilosev.com
13. Create a Mailbox
Navigate to:
- Configuration
- Mailboxes
- Add Mailbox
Create your mailbox by entering the email address, password and mailbox quota.
Installation Complete
Your Mailcow installation is now available at:
https://mail.localmilosev.com/ or https://mail.localmilosev.com:8443/admin/dashboardFor a production installation, remember to configure:
- DNS A records
- MX records
- SPF
- DKIM
- DMARC
- Reverse DNS (PTR)
- A firewall
- Valid TLS certificates
- Details
- Written by: Stanko Milosev
- Category: Ubuntu
- Hits: 28030
To write this article I am using this web site.
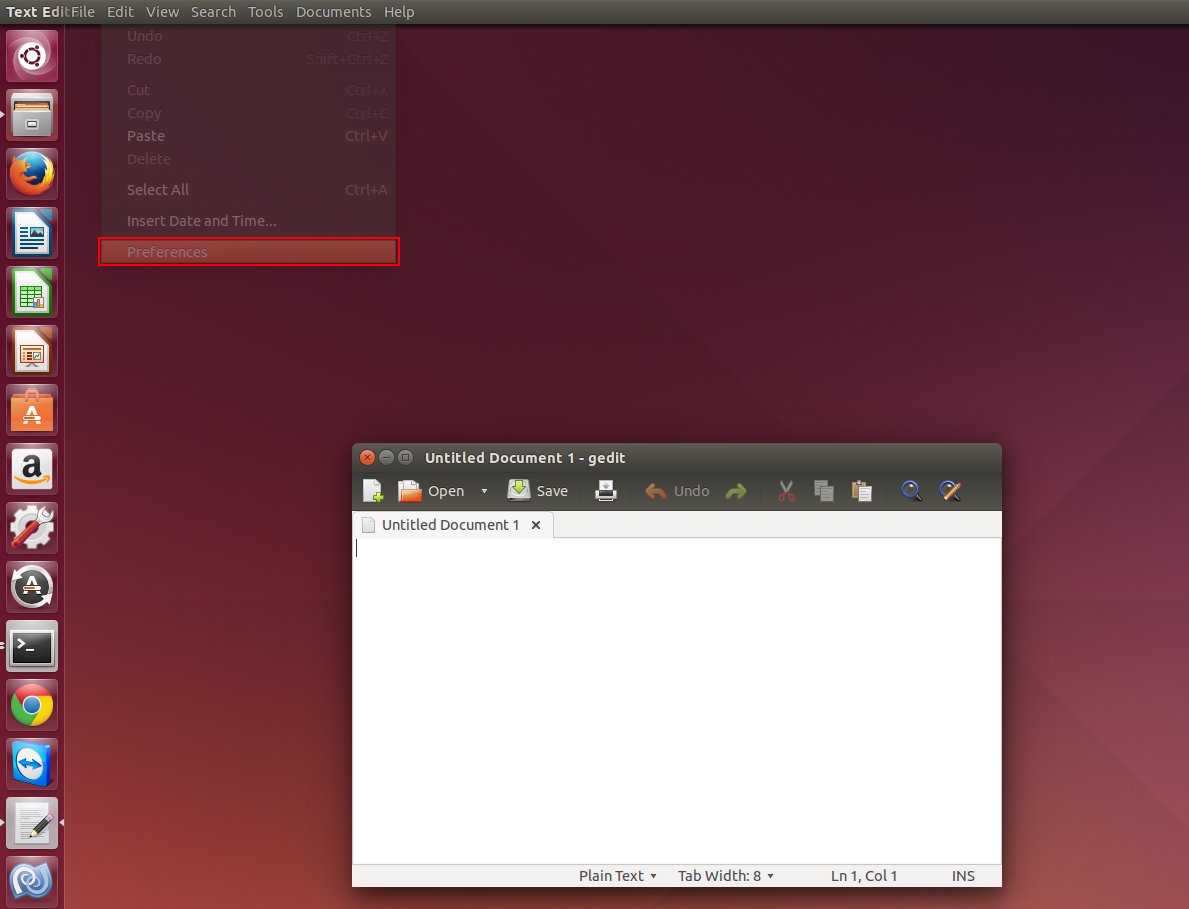
Open Gedit, and while Gedit window is active go to Edit -> Preferences:
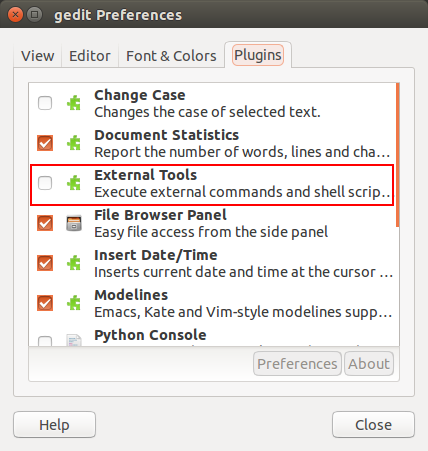
Go to plugins and check external tools:
Now open Manage External Tools:
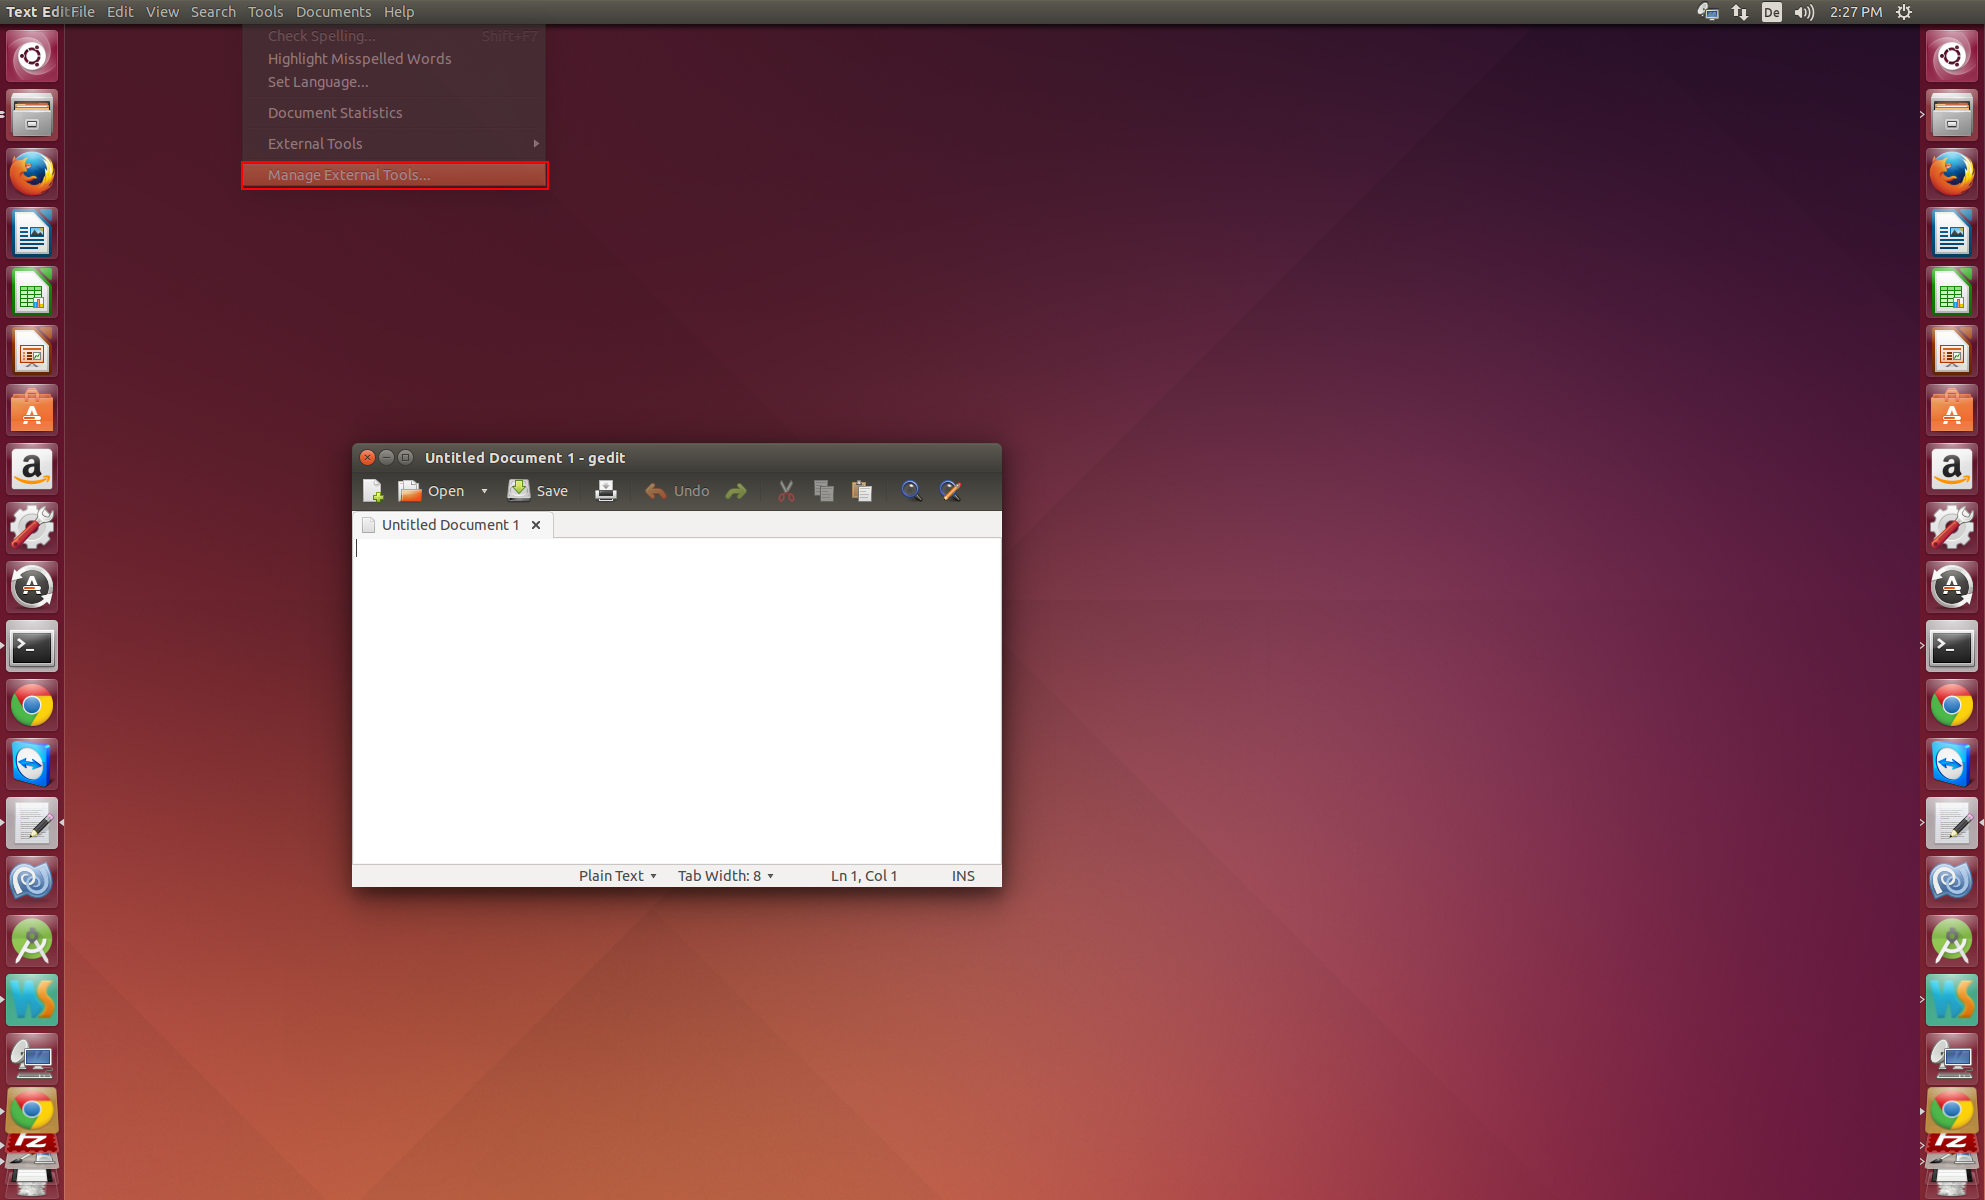
Click add:
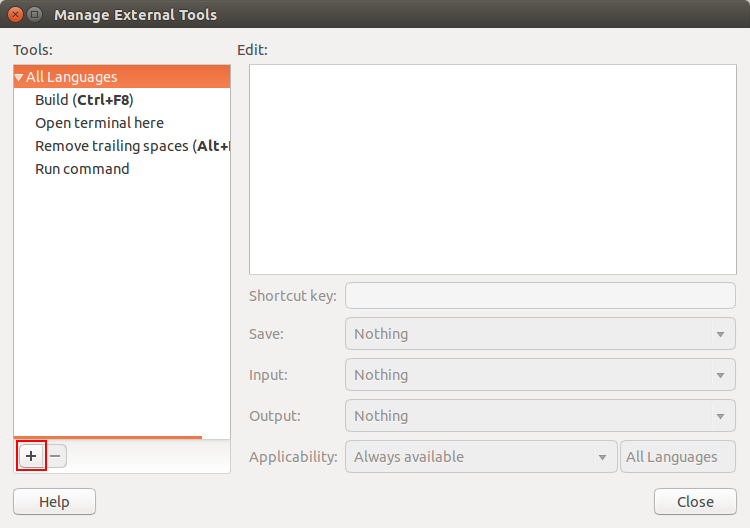
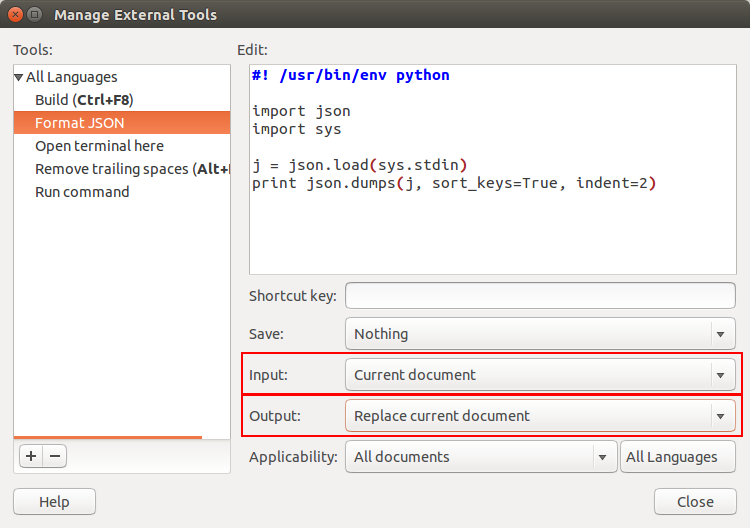
Enter a name (Format JSON), paste this text:
#! /usr/bin/env python
import json
import sys
j = json.load(sys.stdin)
print json.dumps(j, sort_keys=True, indent=2)
Set Input to Current document and set Output to Replace current document: